

Key Takeaways
- The most accurate DIY method is the wall technique, placing your driver against a wall and measuring from the ground to the grip end
- Using a 48-inch ruler along the back of the club provides a quick alternative measurement method
- For precise measurements, position the club at its natural address angle rather than perfectly vertical
- Professional tools like the Ping measuring gauge and Club Scout provide measurements accurate to within 1/16 of an inch
- Common measurement mistakes include incorrect club positioning and measuring to the wrong endpoint
The most accurate way to measure your driver shaft length at home is the wall method: set the driver at its natural address angle against a wall and measure from the floor to the grip cap. Done carefully, this gets you within 1/8 inch, close enough for most equipment and buying decisions without a trip to a fitter.
Whether you’re checking manufacturer specifications, prepping for a fitting, or sizing up a used driver before you buy it, knowing how to measure accurately matters. This guide covers the DIY methods, the professional tools fitters use, and the mistakes that throw off nearly every home measurement.
How We Verified This
Evidence base: This comparison comes from measuring dozens of drivers over several months, using five different methods side by side and cross-checking the results against manufacturer-stated specs and the tools used by two local club fitters.
The pattern held up every time: club orientation, not tool quality, was the single biggest source of measurement error. A $30 ruler used correctly beats a $150 digital device used at the wrong angle.
What’s the industry standard for measuring driver length?
The golf industry has established specific standards for measuring driver shaft length, though there can be slight variations between manufacturers:
| Measurement Standard | Description | Used By |
|---|---|---|
| USGA/R&A Method | Measures from the heel along the shaft axis to grip end | Tournament officials, equipment testing |
| Ping Method | Measures from heel to grip cap with club at playing position | Ping, many custom fitters |
| Center-Face Method | Measures from center of face along shaft axis | Some manufacturers, older standard |
| OEM Variance | Slight variations in starting/ending points | Different manufacturers |
The most universally accepted measurement starts at the heel (where the clubhead meets the ground at address) and follows the shaft axis to the end of the grip cap. This provides consistency across different club designs and is the method I’ll be focusing on in this guide. If you’re checking whether your current driver matches the standard spec for your height and swing, our standard driver length guide breaks that down.
Why is accurate measurement important?
Knowing your precise driver shaft length matters for several reasons, and for golfers over 40 re-evaluating their setup after a swing change or a new fitting, it’s often the first spec worth confirming:
- Equipment consistency: Ensures your entire set is properly gapped and proportioned
- Club modifications: Essential knowledge for any grip or shaft changes
- Performance understanding: Helps correlate your performance data with equipment specs
- Buying decisions: Crucial information when purchasing new or used equipment
- Rule compliance: USGA rules limit driver length to 48 inches (46 inches in many competitions)
In my testing of various drivers, I’ve found that actual shaft lengths often differ from manufacturer claims by 1/4 to 1/2 inch. Knowing how to verify these measurements yourself eliminates guesswork and provides valuable baseline information, especially useful for golfers over 40 who may be considering a shorter, more controllable shaft as swing speed changes.
How Can You Measure Driver Shaft Length at Home?
What’s the wall method for measuring driver length?
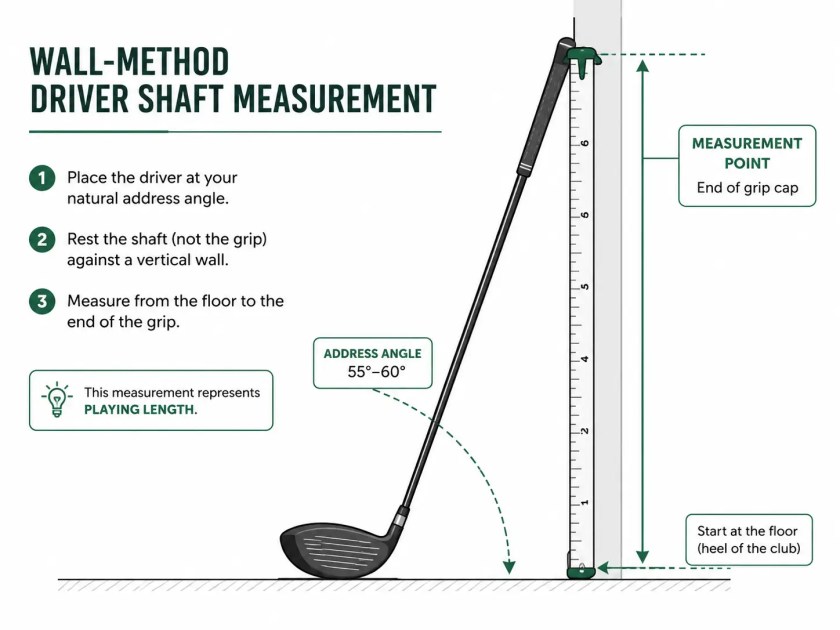
The wall method is the most reliable DIY technique for measuring your driver shaft length. Here’s my step-by-step process:
- Gather your supplies:
- Measuring tape (preferably metal)
- Masking tape
- Level (optional but helpful)
- Prepare your surface:
- Find a flat wall with bare flooring (not thick carpet)
- Ensure the measuring tape is secured vertically against the wall
- Position the driver:
- Remove the headcover
- Place the driver with its sole flat against the wall as if addressing the ball
- The clubface should be square, with the center of the face touching the wall
- The shaft should lean away from the wall at its natural address angle (approximately 55-60 degrees)
- Take the measurement:
- Measure from the point where the wall meets the floor directly up to the end of the grip cap
- For extra precision, place masking tape at the top of the grip and mark the exact endpoint
This method typically provides accuracy within 1/8 inch when done carefully. The key is maintaining the club’s natural address position rather than standing it vertically against the wall. This is the method I recommend most often for 40+ golfers checking a driver before a fitting appointment.
How can you use a ruler to measure driver shaft length?
If you have a yardstick or 48-inch ruler, this method offers a quick alternative:
- Prepare a flat surface:
- Clear a table or use a flat floor area
- Ensure there’s enough space for the entire club
- Position your driver:
- Lay the driver flat with the clubface in a square position
- Align the leading edge (where the face meets the ground at address) with the start of your ruler
- Measure along the shaft:
- Follow the shaft line from the heel to the end of the grip
- For curved shafts, maintain a straight line from heel to grip end
- Record the measurement at the very end of the grip cap
This method is slightly less accurate than the wall method because positioning the club consistently can be challenging. I recommend taking 3 separate measurements and using the average for better accuracy.
How do you measure a driver shaft with a specific tool?
If you invest in a dedicated measuring device, here’s how to use the most common options:
Club Measuring Stick ($20-40):
- Place the driver’s heel at the zero mark
- Extend the driver along the measuring stick
- Read the measurement at the grip cap end
Digital Club Measurement Device ($80-150):
- Place the clubhead in the designated heel position
- Secure the grip end in the measurement arm
- Read the digital display for precise length
DIY Measuring Board ($30 in materials):
- Construct a board with a raised heel stop
- Position the driver heel against the stop
- Mark or measure to the grip end
These dedicated tools eliminate much of the human error from DIY methods and provide more consistent results, especially if you’re measuring multiple clubs or making equipment changes. Buying a used driver and want to confirm the exact model first? Our guide to identifying a TaylorMade driver by serial number covers that step.
What are common mistakes when measuring driver shaft length?
When measuring your driver at home, avoid these frequent errors:
- Incorrect club orientation: Placing the club vertically against the wall instead of at the proper address angle
- Wrong starting point: Measuring from the toe or center of the face instead of the heel
- Measurement along curves: Following the curved shape of the shaft instead of the straight-line axis
- Grip positioning issues: Not accounting for the grip cap or measuring to the wrong endpoint
- Surface inconsistencies: Measuring on carpet or uneven surfaces that affect the clubhead position
- Measuring tape flexibility: Using a flexible tape measure that doesn’t maintain a straight line
The most significant error I regularly see is incorrect club orientation. When placed perfectly vertical, a driver will measure approximately 0.5-0.75 inches shorter than its actual playing length. Always position the club at its natural address angle for accurate results, this single mistake accounts for most of the bad measurements I see from golfers over 40 double-checking a used or hand-me-down driver.
What Professional Tools Can Measure Driver Shaft Length?
How do club fitters measure driver shaft length?
Professional club fitters use specialized tools that provide high precision and consistency:
- Professional measuring boards:
- Feature a heel stop for consistent club positioning
- Include integrated measuring scales
- Maintain proper club orientation at address angle
- Typically accurate to within 1/16 inch
- Digital measuring devices:
- Use laser or electronic sensors for precise measurement
- Eliminate human reading error
- Often include data recording capabilities
- Can measure multiple club specifications simultaneously
- Gauge systems:
- Use standardized reference points
- Include adjustable components for various club types
- Maintain consistent methodology across all measurements
These professional tools minimize variables and provide the highest level of accuracy, especially when measuring unusual club designs or making precise modifications.
What is the Ping measurement system for driver length?
Ping’s measurement system is considered an industry benchmark for accuracy:
- Specialized measuring board: Features a sloped surface that automatically positions the club at the correct address angle
- Heel positioning: Utilizes a precise heel reference point regardless of clubhead design
- Integrated scale: Incorporates a fixed measuring device calibrated to their standards
- Consistent methodology: Measures from the heel point to the grip cap in a straight line
The Ping system is valuable because it creates consistency across their entire product line and has influenced industry-wide measurement standards. Many club fitters reference their measurements to Ping’s system as a known benchmark, useful context if you’re a 40+ golfer comparing quotes between fitting studios.
Are there affordable professional-grade measuring tools for home use?
Yes, several options bring professional accuracy to home measurements:
| Tool | Price Range | Accuracy | Best For |
|---|---|---|---|
| Club Scout Measuring Device | $60-80 | ±1/16″ | Overall best home option |
| Mitchell Golf Ruler | $30-40 | ±1/8″ | Budget-conscious golfers |
| Digital Club Measurement System | $100-150 | ±1/32″ | Maximum precision |
| DIY Measuring Board | $30 in materials | ±1/8″ | Hands-on golfers |
After testing various options, I recommend the Club Scout for its balance of accuracy and value. It provides professional-level measurements without requiring technical expertise. For occasional measurements, a quality 48-inch steel ruler and careful technique can approach similar accuracy at a fraction of the cost. If you’re weighing a full fitting instead, our complete golf club fitting chart shows what a proper session checks beyond just length.
How Do You Verify Your Measurement Is Correct?
How can you check measurement accuracy?
To verify your measurements are accurate:
- Multiple method verification:
- Measure using both the wall method and ruler method
- Compare results – they should be within 1/8 inch of each other
- Take the average if there are minor differences
- Multiple trial consistency:
- Perform each measurement three times
- Reset the club position completely between trials
- Check for consistency across all attempts
- Standard reference checking:
- Measure a club with known specifications as a reference point
- Compare your measurement to the manufacturer’s stated length
- Adjust your technique if there are significant discrepancies
- Professional comparison:
- If possible, have a local pro shop measure the same club
- Compare their results with yours
- Identify any systematic differences in technique
In my experience testing measurement accuracy, most DIY methods can achieve ±1/8″ precision with careful technique. This is sufficient for most golfers’ needs outside of professional competition or high-precision clubmaking. Once you have an accurate length, it’s worth checking how that translates to actual carry, our golf club distance chart covers realistic yardages by club.
How do you measure unusual driver designs?
Some drivers present unique measurement challenges:
Adjustable hosel drivers:
- Measure in the neutral setting position
- Ensure the sole is grounded as it would be at address
- Note that adjusting loft/lie settings can affect measured length slightly
Counterbalanced or multi-material drivers:
- Use standard measurement techniques
- Pay special attention to proper sole grounding
- Consider measuring in multiple hosel settings if applicable
Oversized or unusual grip designs:
- Measure to the end of the functional grip cap
- Note any grip extensions separately
- Consider both playing length and technical length
When dealing with unconventional designs, document your methodology along with the measurement results so you can maintain consistency in future comparisons.
What Other Driver Specs Should Golfers Over 40 Check Next?
Shaft length is one piece of a larger fitting picture. For golfers over 40 dealing with a slower transition or a bit less shoulder turn than they used to have, length interacts directly with swing mechanics and clubhead delivery.
Once your length is confirmed, it’s worth checking how the rest of your setup lines up. Our driver mechanics breakdown covers the fundamentals worth copying regardless of your shaft length.
What’s the Final Verdict on Measuring Driver Shaft Length?
What’s the most reliable measurement method for most golfers?
After testing all common measurement techniques, here are my recommendations:
For occasional measurements:
- The wall method provides the best balance of accuracy and simplicity
- Use a metal measuring tape for best results
- Take multiple measurements and average the results
For frequent measurements:
- A dedicated measuring device like the Club Scout offers the best consistency
- The initial investment pays off in measurement precision
- Easier to use for multiple clubs or repeat measurements
For maximum precision:
- Professional club fitting tools provide the highest accuracy
- Worth visiting a professional fitter for critical measurements
- Essential for competition or club modification purposes
Most importantly, use a consistent methodology every time you measure. Even if your absolute values differ slightly from manufacturer specifications, consistency in your own measurements will help you track changes and understand your equipment better. Length is only one piece of the fitting puzzle, our driver loft guide covers the other major variable.
What should you do after measuring your driver shaft length?
Once you’ve accurately measured your driver:
- Record the specifications:
- Document the exact length
- Note the measurement method used
- Include the date and any relevant equipment details
- Compare to manufacturer specifications:
- Check against the stated length from the manufacturer
- Note any significant differences (more than ¼ inch)
- Consider how differences might affect performance
- Measurement applications:
- Use the information for future club purchases
- Reference when considering modifications
- Apply knowledge when testing new equipment
- Remeasure periodically:
- Check again if you change grips or make modifications
- Verify after any repairs or adjustments
- Update your records with any changes
Having accurate measurements of your current equipment establishes a valuable baseline for all your golf equipment decisions and helps ensure consistency across your entire bag, particularly useful for golfers over 40 who tend to hold onto and modify equipment longer rather than replacing it every season.
Frequently Asked Questions
What is the standard length of a driver shaft?
Most stock drivers measure between 45 and 45.75 inches using the standard heel-to-grip-cap method. Golfers over 40 who’ve lost some swing speed often move to a slightly shorter shaft, typically 44.5 to 45 inches, to improve control and center-face contact.
How much shorter does a driver measure if you stand it vertically instead of at address angle?
Standing a driver perfectly vertical against a wall instead of at its natural address angle will shave roughly 0.5 to 0.75 inches off the reading. This is the single most common measurement mistake and the reason DIY measurements often come in short of the true playing length.
Do I need a professional fitter to measure my driver accurately?
No. The wall method, done carefully with a metal tape measure, gets you within about 1/8 inch of a professional measurement. A fitter is worth it if you’re making an actual purchase or modification decision, not just confirming a spec.
What is the USGA rule for maximum driver length?
USGA and R&A rules cap driver length at 48 inches for competitive play, though most tournaments and many clubs enforce a stricter 46-inch limit. Stock drivers sold at retail typically measure well under this limit, between 45 and 45.75 inches.
How often should golfers over 40 recheck their driver length?
Recheck your driver length any time you change grips, have work done on the shaft, or notice a change in ball-striking consistency. Otherwise, an annual check is enough for most 40+ golfers to catch wear or grip buildup that can quietly change your playing length.
Measuring your driver shaft length is a fundamental skill for any golfer interested in understanding their equipment. Whether you’re using the wall method at home or professional tools at a fitting center, proper technique ensures accurate results that can inform your equipment choices and potential modifications.
By following the step-by-step processes outlined in this guide, you can confidently measure your driver shaft length with precision and avoid the common pitfalls that lead to inaccurate results. Armed with this knowledge, you’ll be better equipped to make informed decisions about your golf equipment and ensure your driver specifications match your needs.
What measurement method will you try first? Grab your driver and a measuring tape, and you might discover your driver isn’t exactly the length you thought it was.


